Tutorial: Custom audio controls in Dear Imgui using GLSL
Here at revivalizer.xyz, we’re all about optimising our articles for maximum readership so we can speed along on our journey towards ultimate technology influencership. That’s why in this article we will cover:
- Rendering UIs in GLSL pixel shaders
- Making custom controls in Dear Imgui
- Implementing good controls for audio related stuff
I’m obviously hoping for Venn diagram unions here, not intersections.
This is the final knobs we will end up with in this tutorial:
So if you know a bit about any of this stuff, you might ask yourself: why make UIs for audio stuff in Dear Imgui? Wouldn’t you use VST? Juce? You know, standard platforms for audio development? And… you’d have a point. But I really don’t like these platforms. ¯\(ツ)/¯
Step 1: Our first custom control in Dear Imgui
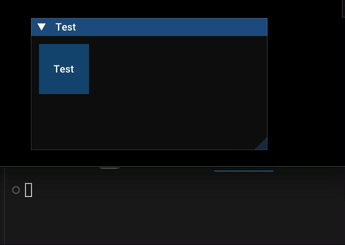
The button
Here’s how you would typically use a button in Dear Imgui:
fn Knob() void {
   if (gui.Button("Test", gui.Vec2(100, 100))) {
       std.debug.print("Button pressed\n", .{});
   }
}
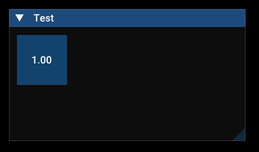
The incrementing button
Now, to extend this, let’s
- Pass a pointer to the f64 value we want to manipulate to
Knob - Display the f64 value as the text label
- Increment the value by 1 if the button is pressed
fn Knob(Value: *f64) void {
   var LabelBuffer: [10]u8 = undefined;
   const Label = std.fmt.bufPrintZ(&LabelBuffer, "{d:.2}", .{Value.*}) catch "error";

   if (gui.Button(Label, gui.Vec2(100, 100))) {
       Value.* = Value.* + 1.0;
   }
}
The dragging button
Okay, that’s a good start, but hardly a custom control. To progress here, let’s forget about using the boolean return value from gui.Button to detect key presses.
Instead, we will define the button as we have been doing so far, and use the IsItemActivated(), IsItemActive() and IsItemDeactivated() functions.
The Item in question will in this case be our recently defined button.
So we will use a structure like the following:
gui.Button(...)

if (IsItemActivated()) {
    // Drag start
}

if (IsItemActivated()) {
    // Drag in progress
}

if (IsItemActivated()) {
    // Drag end
}
This will allow us to do useful things with mouse drag on our Knob control.
For our first pass, we might do something like this to extend our existing button…
fn Knob(Name: []const u8, Value: *f64) void {
    const DragVelocity: f64 = 0.002; // Percent change per pixel

    const state = struct { // These variables are persisted across function calls, like static function variables in C
        var DragStartPos: gui.vec2 = undefined;
        var DragStartValue: f64 = undefined;
    };

    var LabelBuffer: [30]u8 = undefined;
    const Label = std.fmt.bufPrintZ(&LabelBuffer, "{d:.2}###{s}", .{ Value.*, Name }) catch "error";

    _ = gui.Button(Label, gui.Vec2(100, 100));

    if (gui.IsItemActivated()) {
        state.DragStartPos = gui.GetMousePos();
        state.DragStartValue = Value.*;
    }

    if (gui.IsItemActive()) {
        const DragPos = gui.GetMousePos();
        const DragDiff = DragPos.Minus(state.DragStartPos);
        const DragDelta = DragDiff.X - DragDiff.Y;
        Value.* = std.math.clamp(state.DragStartValue + DragDelta * DragVelocity, 0, 1);
    }
}
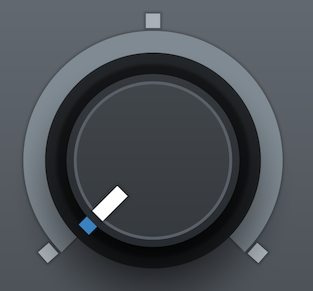
Here are three knobs in action:
![]()
The value
I’ve found that it is very natural to move the mouse up and to the right to make a value bigger, and down and to the left to make it smaller.
So if the user clicks the button, holds the button, and starts dragging, that’s how his motion should influence the value.
In order to do that we need to capture the mouse position on the click, and the starting value of the control.
Then in the dragging phase we update the value to be the starting value plus the drag (DragDelta) times a velocity factor.
I’ve tried to illustrate here:
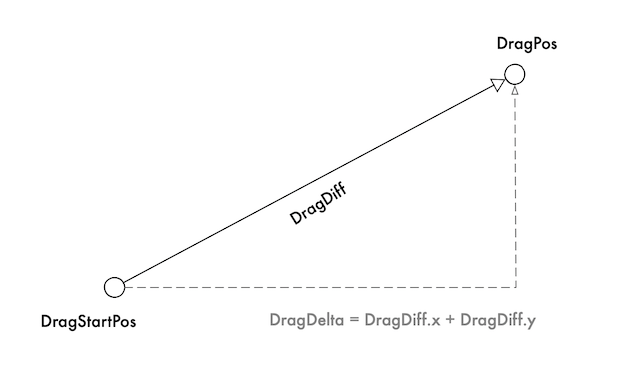
Note that
- The signed DragDelta is just the sum of the x and y components of the DragDiff vector.
- In the code we invert the y-value in the DragDelta computation. This is neccessary because the Dear Imgui coordinate system has y pointing downwards.
Displaying the value as button label
I also want to highlight that we use std.fmt.BufPrintZ to generate the label for the button in a stack-allocated buffer. This is not surprising, but note the use of the ‘###’ construct for the label. This is necessary because in Dear Imgui each control has a unique identifier, which for the button includes the label. If we change the label while dragging, the unique identifier changes and the drag doesn’t work. ‘###’ overrides the label part of the unique identifier with the knob name.
Step 2: A great Knob control for audio
When developing audio synthesis, you need to work with a number of different units or representations, e.g. percent, milliseconds, decibel, frequency, note, octaves and more. Another thing we really need to pay particular attention to is: how can we make it natural for the user to interact with this control? And: what is the natural way for me to use this value in my program?
A good example is a filter resonance (Q) value represented as a percentage.
- Internally we want to use the normalized value [0..1]
- To the user we want to present value in percent [0%..100%]
- Most of the interesting changes happen close to one (a change from 0.90 to 0.95 is much more important than a change from 0.10 to 0.15) so we need to bias the knob resolution towards the high end of the range
That implies the following representation and transform flow:
![]()
To do the forward and inverse transforms, we defined the two following functions. Basically they just take a sequence of transforms (comptime Zig tuple) and apply them in sequence. For the inverse transform we reverse the order and apply the inverse transform. This was the most compact form for this I could find in Zig.
fn ApplyTransformChainForward(Value_: f64, comptime TransformChain: anytype) f64 {
    var Value = Value_;
    inline for (TransformChain) |Transform| {
        Value = Transform.Forward(Value);
    }

    return Value;
}

fn ApplyTransformChainInverse(Value_: f64, comptime TransformChain: anytype) f64 {
    var Value = Value_;
    inline for (0..TransformChain.len) |i| {
        Value = TransformChain[TransformChain.len - i - 1].Inverse(Value);
    }

    return Value;
}
The transforms themselves are structs with Forward and Inverse methods. Here are the Transforms for resolution bias function and the remap transformer.
fn TransformShape(comptime Shape: f64) type {
    return struct {
        const A: f64 = 1.0 - 1.0 / Shape;

        fn Forward(Value: f64) f64 {
            return Value / (Value + A * (Value - 1.0));
        }

        fn Inverse(Value: f64) f64 {
            return (Value * A) / (Value * A + Value - 1.0);
        }
    };
}

fn TransformRemap(comptime Min: f64, comptime Max: f64) type {
    return struct {
        fn Forward(Value: f64) f64 {
            return Min + Value * (Max - Min);
        }

        fn Inverse(Value: f64) f64 {
            return (Value - Min) / (Max - Min);
        }
    };
}
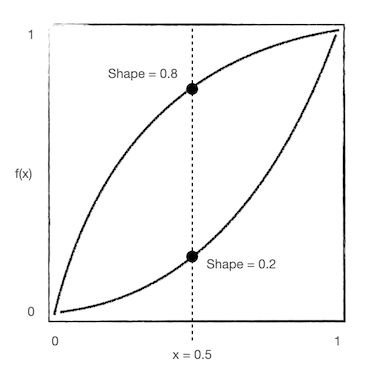
The TransformShape forward function biases a normalized input towards a range. It originates with Christian Budde on the KVR Audio DSP and Plugin Development forum, although I no longer have a link to the specific post.
The brilliant thing about this function is that the curve f(x) will have the Shape parameter value at x = 0.5, making the Shape parameter very intuitive. In other words, f(0.5) = Shape.
With that, the following Knob code does what we want:
fn Knob(comptime Name: []const u8, comptime Format: []const u8, Value: *f64, comptime TransformChain: anytype, comptime LabelTransformChain: anytype) void {
    // TODO: Note that Name may not be unique, so it may be a good idea to push the Value pointer on the ID stack
    // NOTE: We create the label before we update the value (necessary for Button), so label is one frame delayed

    const DragVelocity: f64 = 0.002; // Percent change per pixel

    const state = struct {
        var DragStartPos: gui.vec2 = undefined;
        var DragStartValue: f64 = undefined;
    };

    const ValueTransformForLabel = ApplyTransformChainForward(Value.*, LabelTransformChain);
    var ValueLabelBuffer: [30]u8 = undefined;
    const ValueLabel = std.fmt.bufPrintZ(&ValueLabelBuffer, Format ++ "###" ++ Name, .{ValueTransformForLabel}) catch "error";

    _ = gui.Button(ValueLabel, gui.Vec2(100, 100));

    if (gui.IsItemActivated()) {
        state.DragStartPos = gui.GetMousePos();
        state.DragStartValue = Value.*;
    }

    if (gui.IsItemActive()) {
        const DragPos = gui.GetMousePos();
        const DragDiff = DragPos.Minus(state.DragStartPos);
        const DragDelta = DragDiff.X - DragDiff.Y;
        Value.* = ApplyTransformChainForward(std.math.clamp(ApplyTransformChainInverse(state.DragStartValue, TransformChain) + DragDelta * DragVelocity, 0, 1), TransformChain);
    }
}
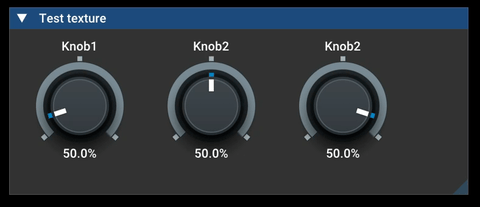
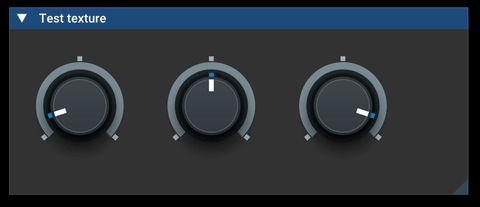
Here are the three knobs we saw previously in action again. Note that now:
- The knobs are biased in their sensitivity, except the middle one
- The knobs present a number in the range [0%..100%], but is internally represented as [0..1]
- The knobs are labeled with a percent sign
![]()
Step 3: Generating Knob visuals
We will generate the Knob visuals in a GLSL pixel shader. I am not going to go into the details of this, but instead refer to this very nice shader by Lastminute, which is apparently a clone of the Serum knob: https://www.shadertoy.com/view/Nl33zN.
The knob looks like this:
(As you’ll see later, this looks really great at a smaller scale.)
I created this gif to demonstrate how the layers in the knob are composed to form the final image.

In my Zig code I generate 91 textures at 100x100 pixels with the blue/white indicator rotated over the different positions, and use the correct texture depending on the normalized control value.
The code looks like this:
pub fn Knob(Name: []const u8, comptime Format: []const u8, Value: *f64, comptime TransformChain: anytype, comptime LabelTransformChain: anytype, Textures: []render.texture) void {
    const DragVelocity: f64 = 0.002; // Percent change per pixel

    const state = struct {
        var DragStartPos: gui.vec2 = undefined;
        var DragStartValue: f64 = undefined;
    };

    const CursorPos = gui.GetCursorScreenPos();

    const TextureSize = gui.Vec2(@as(f32, @floatFromInt(Textures[0].Width)), @as(f32, @floatFromInt(Textures[0].Height)));

    gui.id.PushPtr(Value);

    _ = gui.InvisibleButton("", TextureSize);

    if (gui.IsItemActivated()) {
        state.DragStartPos = gui.GetMousePos();
        state.DragStartValue = Value.*;
    }

    if (gui.IsItemActive()) {
        const DragPos = gui.GetMousePos();
        const DragDiff = DragPos.Minus(state.DragStartPos);
        const DragDelta = DragDiff.X - DragDiff.Y;
        Value.* = ApplyTransformChainForward(std.math.clamp(ApplyTransformChainInverse(state.DragStartValue, TransformChain) + DragDelta * DragVelocity, 0, 1), TransformChain);
    }

    gui.id.Pop();

    // Draw Knob
    const NormalizedValue = ApplyTransformChainInverse(Value.*, TransformChain);
    const TextureIndex: render.GLuint = @intFromFloat(std.math.round(NormalizedValue * @as(f64, @floatFromInt(Textures.len - 1))));
    const Texture = Textures[TextureIndex];

    zgui.getWindowDrawList().addImage(@ptrFromInt(Texture.ID), .{ .pmin = CursorPos.ToImVec2(), .pmax = CursorPos.Plus(TextureSize).ToImVec2(), .uvmin = .{ 0, 1 }, .uvmax = .{ 1, 0 } });
}
With that, we get these beautiful knobs:
With a little bit of code added back in, we can get the final knobs for now:
pub fn Knob(Name: []const u8, comptime Format: []const u8, Value: *f64, comptime TransformChain: anytype, comptime LabelTransformChain: anytype, Textures: []render.texture) void {

    [...]

    // Draw labels
    const ValueTransformForLabel = ApplyTransformChainForward(Value.*, LabelTransformChain);
    var ValueLabelBuffer: [30]u8 = undefined;
    const ValueLabel = std.fmt.bufPrintZ(&ValueLabelBuffer, Format, .{ValueTransformForLabel}) catch "error";

    const NameSize = gui.vec2.FromImVec2(zgui.calcTextSize(Name, .{}));
    const ValueSize = gui.vec2.FromImVec2(zgui.calcTextSize(ValueLabel, .{}));

    zgui.getWindowDrawList().addText(CursorPos.Plus(gui.Vec2((TextureSize.X - NameSize.X) / 2.0, 0.0)).ToImVec2(), 0xFFFFFFFF, "{s}", .{Name});
    zgui.getWindowDrawList().addText(CursorPos.Plus(gui.Vec2((TextureSize.X - ValueSize.X) / 2.0, TextureSize.Y - ValueSize.Y)).ToImVec2(), 0xFFFFFFFF, "{s}", .{ValueLabel});
}
And there you go folks!
More inspiration
If you want more inspiration, you can read this articles describing how an illustrator would go about doing this in Illustrator and Photostop: How to Create a Detailed Audio Rotary Knob Control in Photoshop & Illustrator
I have also previously done some work in this direction, although this targets VST plugins specifically, and the accompanying blog post was lost.